High Precision: A World On Its Own To Be Respected

The write-up analyses the subject of accuracy of precision machines in light of today’s production environment and increased demands made by their users.
| T |
here is a growing demand for superior precision in production for obtaining high-surface finish and close dimensional tolerances eliminating any further machining requirements.
Examples of production processes that require superior precision:
= Hard Turning substituting Grinding
= Die-mould applications eliminating further finishing or polishing operations
A Longstanding Problem
The journey towards precision in machining started in 1775 with John Wilkinson, an English industrialist who invented a precision boring machine of diameter 1800 mm with an accuracy of 1 mm. The dimensional unit for precision has changed gradually from millimeter through Microns* to Sub-microns, Nanometer and Angstrom units.
If we go back a hundred years, when Jig Boring Machines were first designed and developed, we would see that precision engineering was being applied to its limits, as they existed back then.
The watch-making industry required machines to manufacture small components to produce accurate center distances for miniature watch movements. Positioning errors were also found to be caused by heat which is why hand-wheels were moulded in clay to eliminate heat transfer between hand and the lead screw.
Today, undesirable heat originates from the axis drive motors that have replaced hand-wheels. The fact is that even most remarkable technical advances still run-up against the laws of nature, and these laws must be studied and mastered by appropriate means.
The Concept Of Precision Machines
Across the industrial world, high-precision manufacturing is increasingly seen as a set of technologies which are key to global competitiveness. Many advanced technological products necessitate manufacturing processes and machines operating in the regimes of:
= Precision Engineering
= Micro Engineering
= Nano-technology
Worldwide trend in industry reveals that
two major thrust areas of manufacturing technology are:
= Automation in manufacturing [CAD/CAM/FMS/CIM]
= High-precision manufacturing [Precision Engineering / Micro Engineering / Nano-Technology].
To meet requirements of high-precision machines, considerable efforts have been put in the design of machine tools and their elements. The selection of materials required in manufacturing, inspection and assembly is based on their properties: strength, weight, thermal expansion – which contribute to precision. Dimensional changes caused by thermal fluctuation and gradients are very important factors. The compensation and elimination of these effects are some of the design strategies. The effects of change in temperature and heat sources cause changes in size and shape and lead to non-equilibrium conditions.
The desirable properties of the machine tool material are:
= Low distortion under thermal load
= Re-stabilization in rapidly changing
thermal loads
= High-resonance frequencies.
A host of conditions must be met, if work-piece accuracies are to be reached, of which the the following are particularly important:
= Substantial and symmetrical structure of main machine components
= Protection of machine components against heat radiation
= Careful scraping of slide-ways in accordance with specific compensation curves to ensure inherent flatness and straightness of slide-ways and their perpendicularity with respect to another axes. There is still no substitute for fine hand-scraping.
= Z-axis parallel to spindle.
= Perpendicularity of spindle with traverses of other axes.
Other conditions have to be met, such as:
= Optimum layout of machine components and guides to ensure an even load distribution i.e. position of Z-axis screw in the same plane as the spindle axis, thus avoiding leverage.
= The cooling of spindle bearings and associated mechanical components which also have to be kept at constant temperature under extremely varied dynamic conditions.
= The cooling of cutting oil which progressively charged with calories and transfer heat to work-piece.
= Ideal location of measuring systems with regard to the slide-ways and feed screws to reduce positioning errors resulting from reversal of forces exerted into slides.
These and the other sources of instability can lead to significant work-piece inaccuracies and loss of overall machining quality.
The Micron: A Dream or Reality
Not very long ago, only the manufacturers of measuring instruments, jig borers and metrology equipment talked in terms of a thousandth of millimeter and could claim to have some degree of control over how they were used.
Today, nearly all manufacturers and users of machine tools claim to be familiar with this microscopic unit of measurement and even specify its use in such a way they exceed the capability of their own manufacturing and inspection facilities!

The micron must be treated with good deal of consideration and respected.
Do you know, for example:
= Steel enlarges by 0.011 mm/1000 mm/degree Celsius. The slightest change in temperature causes variations of a few microns.
= If a 500mm-long aluminium component is only 2 degrees warmer than an assumed temperature of 22 degrees of measurement machine, the longitudinal measurement error will be nearly 0.030 to 0.040 mm.
= The thermal effect on any object is significant not only in linear dimension but also in shape.
= A change in temperature has different effects on various elements of machine and measuring equipment which take different time spans to attain equilibrium.
= Any slightest heat radiation effecting a machine causes bending or deformation of work-piece or the machine component.
= Along with temperature; dust, humidity, vibration, air turbulence, and noise can effect measurement and machining.
= The foundation on which machine rests is subject to the same physical laws as the machine. Therefore the foundation cannot be subjected to changes in temperature without exerting an effect on machine.
Many machine-tool makers who state accuracies in their brochures imply different meanings as per different standards. Standards and their meanings must be properly understood before getting carried away by numerical values or numbers.
There is no doubt that numerical control has impressively improved accuracy as far as the axis positioning is concerned. The basic structure of machine, its design and dynamic performance are key factors determining stability and accuracy.
What High Precision Means
Association between the accuracy required on a drawing and the indicated accuracy of machine tool provides confirmation that machine needs sufficient accuracy in reserve to allow for the inevitable geometrical variations that occur, without upsetting the range of tolerance. Otherwise this will lead to the non-acceptance of work-pieces.
This involves not just geometrical errors in positioning or on machine itself, but an accrual of all the minor faults connected in one way or the other with machining and work-piece measurement.
What Are These Influences
What are these influences and to what extent do they affect the machine’s basic accuracy?
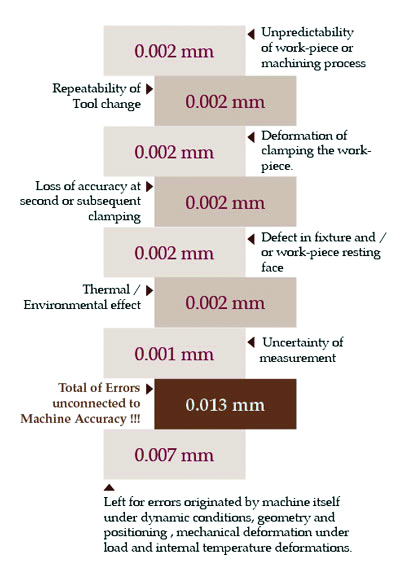
If, say, the mean accuracy of 0.020 mm must be obtained for work-piece on machining center on a 1000 mm cube, the sum of errors can be imagined is as shown in the infographic 1.
Infographic 1: Errors and Influences
It is inconceivable technically, but today the reality is that customers require performances from a typical machine tool that its basic design is not able to give. As a consequence, it will be present many production problems which will need to be solved.
Many times the customers choose machines those are foremost economical but at the same time the customers demand unrealistic specifications, such as:
= Spindle speeds of 20,000 rpm and more are demanded
= Spindle power 20 kW and more
= Rapid feed rates 30 mtr/min and more
= Positioning accuracy of 0.005 mm with repeating accuracy 0.002 mm
Therefore we must ask:
= How to dissipate all excess heat that is unnecessarily generated?
= How do we control acceleration and deceleration?
= How do we control moments of inertia?
= Will the high-speed spindles and their bearings deliver high accuracy under heavy duty conditions?
Machines cannot be used for every conceivable job without certain limitations. There will always be some constraints that need to be taken into account.
* MICRON -The thousandth of a millimeter is becoming more and more a ‘must’. This requires complete adherence to the basic rules of Physics and Metrology.

Author
Mr B P Poddar
is the Vice President of Sales and Marketing at Fatty Tuna India Pvt Ltd. He has 30 Years of experience in Metal Cutting Machine Tools and Auto Component Manufacturing industry and has worked with several German and Swiss machine tool makers in various technical & management positions. He delivers keynote speeches at prominent industry events, and writes articles for leading industry magazines
and portals.


